Friday, January 31, 2014

New Tag...tutorial to come soon!


Newest tag, made today :)
Using the awesome kit ScrapMonti_IB-DeaconBlack-54-2
Which you can buy at CDO, here
Check back later for the tutorial!

Thursday, January 30, 2014

Beautiful Butterfly Tutorial


You can click the image to see it in full size :)
Thank you for taking the time to do my tutorial. I hope you enjoy it, and would love to see your results, and receive your feedback! This tutorial was written by Mellie on January 30, 2014 and is copyright to me, the way I word thing's and the images that I use. All other images are copyright to their respective owners, including tubes/art, font and scrapkits and templates should not be used without purchasing or written permission, nor without reading their terms of use. This tutorial is for education purposes only and is in no way intended to be used as any other purpose. This tutorial was written with the tube and kit in mind that is being shown, therefore, you may have to adjust your setting's should you choose to use images not suggested here, in this tutorial. For this tutorial, you will need several things. Paint Shop Pro (I am using version X), and a good working knowledge of how to operate it, masks, layer palettes and plug-in filters.

For this tutorial, you will need the following items:

My template
Tube by VeryMany - Butterfly
Scrap Kit by the wonderful and talented Monti
Plug In - Gabage Collections - Pentacom Dot and Cross
Plug In - Mura's copies
VixMask # 362

Ok, let's begin!

Open my template in psp, shift + D and close the original. Hide copyright and background layers. Image>Canvas Size> 800X800 pixels. Open feather 4, copy/paste as bottom layer on the canvas. Image>Resize> 40%. Add the plug-in muras meister - copies, at the bottom left, in the drop down, choose encircle and at the top right, click and change the number to 12, click ok.
Click rounded rectangle layer, using magic wand, tape the blue area one time.
Open your tube and arrange it so that you can copy the blue layers together on the "close up", paste as a new layer, and resize to 60% arrange into the floating section as desired...Selections>invert and tap delete on the keyboard. Set your blend option to overlay and 40% opacity. While selected add plug in - dot and cross with this setting: Amount 40, Cross distance 4, Cross width 2. Deselect.
Select Square 1, and repeat as above only add the dot and cross to the tube layer. Select square 2, and repeat. Select oval layer and repeat.
Open element - Doodle 4, copy/paste as new layer. Drag it above the feather circle layer we made earlier. Resize this layer to 90%, sharpen twice, and duplicate the layer. Image>Mirror, Image>Flip. Drag the two into place, and add drop shadows to both layers.
Open paper 16, copy/paste as new layer, send to bottom, add mask ...layers>merge>group. Resize to 85%.
Add your copyright information and your name. Save. Done!
Thank you for doing this tutorial. I'm glad you stopped by. I hope to have more tutorials in the near future, so keep checking back. :)

Wednesday, January 29, 2014

Those Fab 50's


Those Fab 50's


Thank you for taking the time to do my tutorial. I hope you enjoy it, 
and would love to see your results, and receive your feedback! 
This tutorial was written by Mellie on January 29, 2014 
and is copyright to me, the way I word thing's and the images that I use. 
All other images are copyright to their respective owners, including tubes/art, font and scrapkits and templates should not be used without purchasing or written permission, nor without reading their terms of use

This tutorial is for education purposes only and is in no way intended 

to be used as any other purpose. This tutorial was written 
with the tube and kit in mind that is being shown, 
therefore, you may have to adjust your setting's 
should you choose to use images not suggested here, in this tutorial. 
For this tutorial, you will need several things. Paint Shop Pro (I am using version X), and a good working knowledge of how to operate it, masks, 
layer palettes and plug-in filters.


List of item's needed for this tutorial:
Tube by Popeye Wong. It's called twist and roll.
 Paint Shop Pro X (or other similar version)
Scrapkit by the wonderful and talented Monti - The 50's Rock
Plug - in - Filter: Mura's Meister: Copies 
Font of Choice: I am using 2Peas Mr. Giggles.

Let's begin!

Open paper 8, shift + D, close the original. Apply Chrissy's Chaos_Mask 6, layers>merge>group. Add a new raster layer and flood fill with color #aae5ab. Apply WSL_Mask 246, layers>merge>group.
 Drag this to your bottom layer, resize to 80 or 85% and lower the opacity to 60%. 

Go back to the top layer.
 Open Neon.png and copy/paste as a new layer and resize to 85%, 
(I chose to use my selection tool and cut off the bottom portion it this image) 
sharpen and add a light drop shadow of choice.

Open jukebox.png and copy/paste as new layer. 
Resize to 50%, sharpen and add drop shadow. 
Open burger, fries and milkshake-strawberry elements, 
copy/paste as new layer as shown above, 
resize burger and fries to 20% and milkshake to 40%,
 sharpen all layers and drop shadow. 
Open caddilac.png and copy/paste as new layer,
 drag it beneath the jukebox layer 
(I chose to use my selection tool to cut off the back part of it) 
sharpen and drop shadow this layer. 
Add your tube as your top layer, resize as needed, and drop shadow this layer.
Open music note 1/copy/paste as a new layer
Resize by 25%/go to mura's copies
Plug - in filter with this setting. In the drop
down menu,choose spiral, and in the number area,
type 14 instead of 20. click ok.
Drag this down so that it is above your two mask layers
making it the 3rd from bottom Open music note 2
and repeat the same steps as with music none 1
don't forget to sharpen after resizing, and add your
drop shadow after adding copies
Add all of yyour copyright information and your name
Viola! Done! Save your image!
Thank you for doing this tutorial.
I'm glad you stopped by. I hope to have more tutorials
in the near future,so keep checking back
                                                

Sunday, January 26, 2014

Beautiful....Just For You Tutorial


Click the image to see it in full size.
Thank you for taking the time to do my tutorial. I hope you enjoy it, and would love to see your results, and receive your feedback! This tutorial was written by Mellie on January 25, 2014 and is copyright to me, the way I word thing's and the images that I use. All other images are copyright to their respective owners, including tubes/art, font and scrapkits and templates should not be used without purchasing or written permission, nor without reading their terms of use. This tutorial is for education purposes only and is in no way intended to be used as any other purpose. This tutorial was written with the tube and kit in mind that is being shown, therefore, you may have to adjust your setting's should you choose to use images not suggested here, in this tutorial. For this tutorial, you will need several things. Paint Shop Pro (I am using version X), and a good working knowledge of how to operate it, masks, layer palettes, plug-in filters and animations.
These item's are what you will need for this tutorial:
Mask 1 (Valentine Swirls)
Mask 2 (Heart Burst)
Tube 35-3, by Jamie Kidd, at CDO
IB Scrapkit Jamie Kidd - 35-3 by Schnegge at CDO
Toadies Ommadawn (install into your plug in folder)


Let's get started!
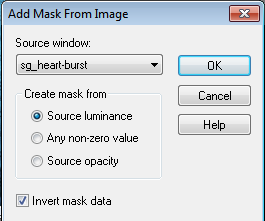
The first thing we need to do is open paper 05, shift + D, close the original. Open both the masks in PSP and apply mask "heart burst" with this setting:


Layers>Merge group. Add a new layer, send to bottom in your layer palette. Grab your airbrush tool, with these settings: 

I am using color #b7edf3 from the tube. Spray the layer for several consecutive seconds. (2-3) and release. You may want to resize this layer, I did by 85%. Effects>Plug Ins>Toadies>Ommadawn with these settings:


Open paper 03, and on a new layer, flood fill the canvas with it. Apply the valentine swirls mask only this time UNCHECK the invert mask data. Drag this layer above your bottom layer, so that it is your second layer and between bottom and former mask layer.
Open element 06 and copy/paste as a new layer. Position to the left on canvas. Layers>Duplicate>Image>Free rotate> Click right and 90°, make sure you're not rotating all layers! Layers>duplicate>Image>Flip. Go back to the original layer element 06 and duplicate again, Image>Mirror. Merge the 4 together and add drop shadow.
Open Frame 02, and copy/paste as a new layer, making sure it is your top layer now. Click the inside of it with your magic wand and Selections>Modify>Expand 5 pixels, ok. Add a new layer and flood fill with paper 05, pull this layer below your frame layer and deselect. On your frame layer, go to Image>Free rotate>Left>90°, Image>Flip. Click your flood fill layer, selections>select all>selections>float, paste the largest of the tube layers as a new layer, selections>Invert and on the tube layer, tap delete on keyboard. In your layer palette change the blend option to overlay.
Open element 04, the flower, set your foreground color to #2e7697, copy/paste as a new layer, top layer, and grab your recolor tool and tap it several times. Image>Resize by 45%, add drop shadow and place over the black flower on the frame. Open the element 08 and repeat copy/paste and colorizing steps, drag beneath the flower layer and free rotate to your liking. I used something like 20% and flipped a couple of mine. Don't forget to add drop shadows and sharpen your layers!
Add remaining elements of choice, I used the butterfly and word art. Drop shadow and position.
Add your tube behind the fern and flower layers, but above the frame layer.
Add your name and any last item's. Add your copyright information. Resize as needed.
On your bottom layer, the ommadawn layer, click the black lines with your magic want tool, flood fill with a matching color I am using #2e7697. Adjust> add/remove noise>add noise with this setting Gaussian checked, monochrome checked, noise level 20%, click ok. Deselect>Layers>merge all flatten. Copy/paste into animation shop as a new image> Go back to PSP and undo merge, undo deselect and undo add noise. Add noise again, this time changing noise level to 30%. Deselect, merge and copy/paste into animation shop after current frame. Go back to psp and undo merge, undo deselect, undo add noise. Add noise again, only this time changing noise level to 40%. Repeat deselect, merge and copy/paste after current in animation shop. Save your image!
Thank you for doing this tutorial. I'm glad you stopped by. I hope to have more tutorials in the near future, so keep checking back. :)

Wednesday, January 22, 2014

What A Girl Needs


Thank you for taking the time to do my tutorial. I hope you enjoy it, and would love to see your results, and receive your feedback! This tutorial was written by Mellie on January 22, 2014 and is copyright to me, the way I word thing's and the images that I use. All other images are copyright to their respective owners, including tubes/art, font and scrapkits and templates should not be used without purchasing or written permission, nor without reading their terms of use. This tutorial is for education purposes only and is in no way intended to be used as any other purpose. This tutorial was written with the tube and kit in mind that is being shown, therefore, you may have to adjust your setting's should you choose to use images not suggested here, in this tutorial. For this tutorial, you will need several things. Paint Shop Pro (I am using version X), and a good working knowledge of how to operate it. You will also need this IB scrapkit made by talented Monti. The tube by Pinup Toons, which can be purchased here. Please do not use artist's work without purchasing! You'll also need a font of choice. This mask, and this mask, which is WSL340 by Weescots Lass :)

Let's begin, shall we? :)
Open a new, transparent canvas, 800 pixels by 800 pixels. Open both of the masks. Flood fill your blank canvas with paper 4, the pink one, and add WSLMask 240. Merge group in your layer palette. Add another new layer and flood fill with paper 5, add mask 
0mask046_LT. Merge group in your layer palette. Close the masks. Open Monti's frame 1 and copy/paste as a new layer onto your canvas. Resize if needed. Using the magic wand tool, select the inside of the frame, Selections>Modify>Expand by 1 pixel, add a new layer, and fill with paper 4. Move this layer below the frame layer. Open element 23 and paste as a new layer, while still selected, selections>invert and on element 23 layer, tap delete on keyboard. Resize as needed. Open element 22, copy/paste as a new layer while still selected, selections>invert and on element 22 layer, tap delete on keyboard. Resize as needed, sharpen and add drop shadow. Deselect this layer, and duplicate>Image>Mirror>Image>Flip. Add your tube, making sure she is the top layer. Try to line up her legs so that she blends in with the frame as shown below.


Resize as needed, sharpen and add drop shadow to the tube layer. Add remaining elements as shown, resizing as desired. Sharpen and add drop shadows on each layer.
Add name and copyright information. Merge and save!
Thank you for doing this tutorial. I'm glad you stopped by. I hope to have more tutorials in the near future, so keep checking back. :)  

Tuesday, January 21, 2014

CT Tutorial - Sweet Tooth

Mellie Bean Tutorial


Thank you for taking the time to do my tutorial. I hope you enjoy it, and would love to see your results, and receive your feedback! This tutorial was written by Mellie on January 17, 2014 and is copyright to me, the way I word thing's and the images that I use. All other images are copyright to their respective owners, including tubes/art, font and scrapkits and templates should not be used without purchasing or written permission, nor without reading their terms of use. This tutorial is for education purposes only and is in no way intended to be used as any other purpose. 


This is an advanced level tutorial. For this tutorial, you will need several things. Paint Shop Pro (I am using version X), and a good working knowledge of how to operate it,  and masks and templates, as well as working with your layer palette, and animations. You will also need this scrapkit made by talented Monti. The tube that I used is by the artist Sebastien Serrano and can be used by purchasing it from CDO along with a license. You'll need this template by Millie's PSP, it is sweet tooth 01 in the pack. You'll need animation shop. You'll need a font of choice. I'm using Fabulous 50's and it can be found here. Lastly, you'll need my glitter tile, right click to save to your computer.


Let's begin. Open the template in PSP; shift + D to copy, and close the original image. For now, hide, the layers that contain the text, there should be 3 and they should be the top 3 layers in your palette. Scroll to the bottom layer and unhide the white background layer, for now. Now, click on layer 5, the darker brown, and press ctrl + A, then ctrl + F to float it, flood fill with paper 4. Deselect and add drop shadow of choice. Now, select layer 4 and do the same thing as before, only fill with paper 3 this time. Now select layer 1 and do the same thing, only fill it with paper 2. Next click on layer 3, using your dropper tool, select a color from the tube that you'd like to use. I chose #f77388 do the same as before and flood with that color, do the identical color to layer 7 as well. Deselect and add drop shadows to each layer. Select layer 2, and do the same, only flood fill with black, deselect and add drop shadow. Select layer 8, select all and flood with paper 5, go to selections>modify>contract type in 5, click okay, and add a new layer, fill with black color and go to selections>modify>contract and type in 2, click ok and flood fill with color #ece8bb. Deselect this layer, add drop shadow. Click on layer 6 and repeat the identical steps as with layer 8.
Time to start adding our elements! Click the beige layer that you added over layer 8, ctrl + A, ctrl + F and open element 3, the milkshake and copy/paste as a new layer; position the shake as desired in the layer and go to selections>invert and tap delete on the keyboard. Deselect and add drop shadow. Now, do the same thing for the new layer that you added over layer 6, copy/paste element 6 as a new layer and resize to 60%. Don't forget to add your drop shadow to your layers each time :)
Now, select layer 7 in your palette, ctrl + A, ctrl + F to float it, copy/paste element 19 as a new layer, and place inside floating section as desired, selections>invert and hit delete on the keyboard. Deselect and drop shadow this layer. Go back to layer 2, the black layer, ctrl + A, ctrl + F; selections>modify>contract type in 5 and click ok, flood fill with paper 6. Don't deselect it yet, copy element 10 and paste as a new layer, resize as needed and position over floating section, selections>invert and hit delete on the keyboard. Deselect and add drop shadow to this layer. Now, go back to layer 5, ctrl + A, ctrl + F, selections>modify>contract and type in 5, click ok; copy/paste the largest of the tube image as a new layer and place into position as desired over the selection area; selections>invert and hit delete on the keyboard. Deselect and add drop shadow. Add your main tube image as a new layer, add drop shadow. Add any remaining elements to the area that you'd like. I added the skate last minute, to the bottom left of the canvas :)
Now, add your name, your copyright information and anything else you'd like. Go back to layer 3, the untouched layer ;) drag it between layers 4 and 5; ctrl + A, ctrl + F, open my pink glitter image in PSP and flood fill this layer. Deselect, and go to layers>merge visible. Copy your image and paste as a new image in animation shop. Go back to PSP and unmerge the layers, then undo deselect, and undo flood fill. Now, flood fill with the pink glitter fill again, only this time change the angle to 45°. Deselect, merge visible, copy/paste AFTER CURRENT FRAME in animation shop. Go back to PSP once again, and undo merge, undo deselect and undo flood fill, once again flood fill with the pink glitter but change to 140° angle. Deselect, merge visible and paste after current again in animation shop. Save your image. Done!

Thank you for doing this tutorial. I'm glad you stopped by. I hope to have more tutorials in the near future, so keep checking back. :)

Wednesday, January 15, 2014

CT Tutorial - A Forever Love


Mellie Bean Tutorial


Thank you for taking the time to do my tutorial. I hope you enjoy it, and would love to see your results, and receive your feedback! This tutorial was written by Mellie on Jaunary 14, 2014 and is copyright to me, the way I word thing's and the images that I use. All other images are copyright to their respective owners, including tubes/art, font and scrapkits and should not be used without purchasing or written permission. This tutorial is for education purposes only and is in no way intended to be used as any other purpose.

For this tutorial, you will need several things. Paint Shop Pro (I am using version X), and a good working knowledge of how to operate it,  and masks.. You will also need this wonderful scrapkit made by Monti. The tube that I used can be found here, it is by PinupToons and you must be licensed by CDO and purchase the tube. The font that I used, Cheri, can be found here. Mask by Vix, #448, which can be found here. And another mask by WeeScotsLass which can be found here,#353.

Let's begin, shall we?

Open your masks. Open a new blank, transparent canvas 750 X 750 pixels (don't worry we can resize it later). Flood fill with paper 6 by Monti. Open your mask and go to Layers>New Mask Layer>From Image and in the drop down menu, choose the file name of the mask. Make sure source luminance is the only box ticked, and click ok. You can close the mask image, as we won't need it any longer. Right click on your layer palette, and choose merge>group. Open Frame2 and copy/paste as a new layer. Using your magic wand tool, select all the transparent areas inside of the frame, once you have those selected click on your mask layer and choose Selections>Invert, tap delete on your keyboard and deselect. Add a new raster layer, and flood fill with a color of choice. I am using #5c0202. After you flood fill, drag this to the bottom layer and add weescots lass' mask #353. Right click on layer palette and merge group. Make sure that this is your bottom layer.
Open element swirl, copy/paste as a new layer, drag between the LOVE mask layer, and frame layers. Resize this layer to 65%, sharpen and add drop shadow and drag into desired position. Add any remaining elements that you would like. I added a couple of feathers and the swirl element. I also resized, sharpened and added drop shadow to the swirl.

Now it is time to resize/trim the canvas of excess pixels. Layers>Merge>Visible. Copy and paste as a new image. (If you plan on making more of these, you might consider saving your original unmerged as a psp file)
Now, you have to add your name, your copyright information and then you can flatten all of your layers, or choose to leave it transparent as a png file.
That's it! Thanks for doing my tutorial and I hope to have more in the future. 

Monday, January 13, 2014