Showing posts with label Monti Scraps. Show all posts

Saturday, March 7, 2015

CT Tutorial for Monti's Scraps - Out of This World

Out Of This World Tutorial

Thank you for taking the time to do my tutorial. I hope you enjoy it, and would love to see your results, and receive your feedback! 
This tutorial was written by Mellie on March 7, 2015 and is copyright to me, the way I word thing's and the images that I use. 
All other images are copyright to their respective owners, including tubes/art, font, scrapkits and templates and should not be used without purchasing or written permission, nor without reading their terms of use. 
This tutorial is for education purposes only and is in no way intended to be used as any other purpose. This tutorial was written with the tube and kit in mind that is being shown, therefore, you may have to adjust your setting's should you choose to use images not suggested here, in this tutorial. 
For this tutorial, you will need to know several things. Paint Shop Pro (I am using version X), and a good working knowledge of how to operate it, layer palettes and plug-in filters, masks, templates...etc. I will also assume that you add your desired drop shadows to each and every layer. You can click on the image to see it full sized.


For this tutorial, you will need the following items:

Paint Shop Pro, I am using version X
Font of choice, I am using Heavy Data
Forum Mask 16: MB and SW. She has some wonderful FB timeline masks as well that would also work wonderfully.
AAA Foto Frame plug in filter
Muras Copies filter.


Let's begin, shall we? 

Create a new, blank canvas in psp. It needs to be 851 wide pixels by 315 pixels high.
Flood fill with paper 8, at 120% size. Apply the mask INVERT checked, and merge group layers. Lower the opacity to something between 75-80%.
Close the original paper.

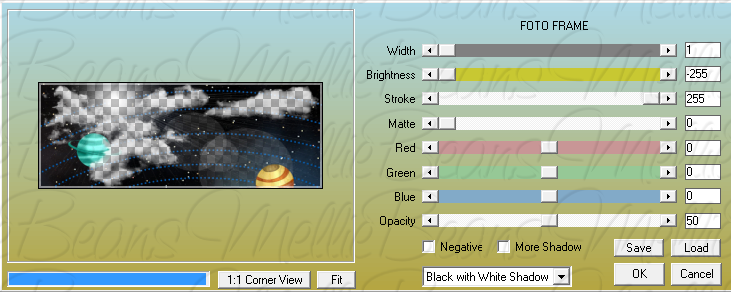
Apply the filter Foto Frame with the following settings: (you can see it full size by clicking the image)


Open element 18. Copy and paste onto your canvas, close the original.
Resize the element to 45% of it's original size. Using the tool, rotate go to "Image>Free Rotate>Right ticked off>Free ticked off>type 25.00 and click ok.
Now click "Adjust>Sharpness>Sharpen. Drop shadow your layer, and move it close to the left side of the canvas, near the planet on the paper layer.

Open element 16. Copy and paste onto your canvas, close the original.
Resize the element to 45% of it's original size. Now click "Adjust>Sharpness>Sharpen".
Drop shadow your layer.

Open element 45. Copy. Click your background layer, and paste as a new layer. Resize this element to 70% of it's original size. Leave in place.

Open element 23. Copy and paste onto your canvas. Resize this element to 80% of it's original size. Now click, "Adjust>Sharpness>Sharpen". Drop shadow your layer and leave in place.

I want to add something to the bottom, it's force of habit. I like the way that looks, when I see a timeline set. So, let's build the bottom up a little :D

Open element 49. Copy and paste it as your top layer. Using your pick tool (press K on your keyboard) stretch it so that it meet's the edge's of the canvas. Move it down to the bottom as desired. Drop shadow your layer.

Open element 42. Copy and paste, drag layer below element 49 layer. Resize to 25% of it's original size. Now click, "Adjust>Sharpness>Sharpen". Apply Muras copies filter. On the drop down menu, choose line. Type 7 in the "Number" box, leave everything else default and click ok. Drop shadow your layer.

Open element 59. Copy and paste as a new layer. Using the pick tool, stretch to meet the edges of your canvas. Click "Adjust>Sharpness>Sharpen", repeat. Drop shadow your layer. Drag below the top layer, so that this is your second layer.

Open the wordart. Copy and paste it as a new layer. Using your pick tool, size it down as desired. Drag this below the satellite image layer (element 18). Drop shadow your layer. Move it to the top left of the canvas.

Now you'll need to add your name and any copyright information for the kit, and/or tube should you choose to use one.

Don't close it yet, though. We need to make our matching avatar, for your profile picture.
Avatar size should be 180 pixels by 180 pixels.
Create a new, blank canvas of that size.

Go back to your timeline banner image.

I always try to use the area of the timeline that would be covered by the profile picture.

So once you have an area chosen, get your selection tool (make sure it's set to rectangle) press and hold the mouse over the area of the timeline cover that you want to use for your avatar. If you watch below on the status bar it will tell you how big the area is that you're selecting. It takes a bit of practice, but you can do it. Once you have the area large enough to fill the 180 X 180 canvas, simply let go of the mouse and copy it. Paste it onto your blank canvas.

Now, using the same font you used for your timeline banner, add your first initial.

That is all! You're done , Merge all layers visible and save!


Thank you for taking the time to do my tutorial. I hope to offer more in the future, so keep checking back!


Sunday, November 16, 2014

CT Tags for Monti's Scraps

CT Tags for Monti Scraps using her portion of the CDO Christmas collab. 
You can read all about how to obtain the collab by going HERE.
I'm also using the artwork of Souldesigner, 
called Sheila which is available at PFD
Mask's used are by Mythical
And, finally, I'm using a tag template 707 by the lovely Millie

Thanks for looking!


.

Thursday, November 13, 2014

CT tag for Monti's Scraps


I love this new pink kit that Monti's Scraps is releasing. 
This gorgeous kit can be found at CDO
as well as the tube which is by the awesome and talented Marika.

Thanks for looking!


Tuesday, November 11, 2014

Friday, October 31, 2014

Thursday, October 9, 2014

Monti's Scrap CT Tags


This tag made with the amazing artwork of trinita and the gorgeous kit of Monti's Scraps


These two tags made with the amazing artwork of  Arthur Crowe and the bomb kit by Monti's Scraps.

Wednesday, September 24, 2014

Trick or Treat - Bitches

CT tag for Monti using her scrap kit: IB-MarylineCazenave-27-1  
which you can purchase at CDO.
 I also used the artwork of Ismael Rac called Witch Emo

Happy Halloween!


Sunday, August 31, 2014

CT Tag for Monti's Scraps


This tag was created for Monti, using her IB-Marika-12-2 kit at CDO
and the gorgeous artwork of Very Many, called Felicity


Monday, August 25, 2014

New CT Tag for Monti's Scraps


New CT Tag for Monti Cole
using her kit IB-Marika 33-1 
and the artwork of Marika
you can find them both at CDO


New CT Tag for Monti, using her kit IB-Marika 33-1 and the artwork of Marika, you can find them both at CDO.


Sunday, August 24, 2014

Friday, August 15, 2014

Heads Will Roll - Animated Tag Tutorial


You can click the tag image to enlarge it :)

Thank you for taking the time to do my tutorial. I hope you enjoy it, and would love to see your results, and receive your feedback! This tutorial was written by Mellie on August 15, 2014 and is copyright to me, the way I word thing's and the images that I use. All other images are copyright to their respective owners, including tubes/art, font, scrapkits and templates and should not be used without purchasing or written permission, nor without reading their terms of use. This tutorial is for education purposes only and is in no way intended to be used as any other purpose. This tutorial was written with the tube and kit in mind that is being shown, therefore, you may have to adjust your setting's should you choose to use images not suggested here, in this tutorial. For this tutorial, you will need to know several things. Paint Shop Pro (I am using version X), and a good working knowledge of how to operate it, layer palettes and plug-in filters, masks, templates...etc. I will also assume that you add your desired drop shadows to each and every layer. :)


You will need the following in order to duplicate my tag:


PinUp Toons tube - HERE
Scrap Kit by Monti - HERE
PSP X or similar version
Animation Shop
Font of choice I am using Alice In Wonderland. :)
Xero - Porcelain and  Soft Vignette

Let's begin, shall we? :)

Open frame 1 provided in Monti's kit, duplicate ( shift + D) and close the original. Resize the frame to about 80%, all layers unchecked.

Open paper 2, and set it as your background fill. Close your foreground fill and using your preset tool, ellipse, draw out a circle (hold down shift for a perfectly round circle) about 472 pixels. Convert to raster layer and place as bottom layer, in layer palette. Duplicate this layer so that you have a total of 4 layers. Close the paper, we're done with it.

Click the second layer of paper you created and go to Image>Free rotate. Click on right, then click free and type in 30, uncheck the 2 boxes at the bottom and click on OK.
Repeat this same step for the next two layers, only change the rotation to 60 and 90. Leave the original paper as is.

Now, let's start decorating our tag :)Add the largest tube layer, over your paper layer, and resize accordingly. Apply Xero Vignette and Xero Porcelain with these settings:


I will leave this part to you and your taste mostly. I am using some of the same elements that are on the frame. I have moved, placed and resized them and made it look as if she's behind them, to help cover the part that is cut off. Just use your pick tool to drag and resize those 3 elements.

Now, let's add some more elements:

Element 36 across the top layer Element 31 top layer, left
Element 30 layer above the frame.
Now, let's work on adding our copyright information and name or text. I am using a font called Alice In Wonderland at 72 pt. in black. I am also adding a stroke of white to mine :)
Add your copyright information.
Once you have everything in place, and the way that you like it, we need to start on the animated portion of the tag.

Click the first paper layer you created on the tag. Hide the other 3 copies of it, and merge visible. Copy/paste as a new image in PSP, merge all, flatten, then copy/paste into animation shop.

Go back to psp, undo merge, hide current layer and click on the next layer, merge visible and copy/paste as new image. Flatten. Copy/paste into animation shop, but click on edit> paste after current frame.

Go back to psp, undo merge, hide current layer and click on the next layer, merge visible and copy/paste as new image. Flatten. Copy/paste into animation shop, but click on edit> paste after current frame.

Do this until you've used all 4 layers.

Now, in animation shop highlight the 2 middle frames by using your arrow keys on your keyboard and pressing shift. Copy. Then highlight the last frame and go to edit>paste after current. You should have a total of 6 frames now.

Save your image and you are done!

Thank you for taking the time to do my tutorial. I hope to offer more in the future, so keep checking back!

Saturday, July 12, 2014

CT For Monti - Anna Liwanag


You can click the image to see it in full size.

Thank you for taking the time to do my tutorial. I hope you enjoy it, and would love to see your results, and receive your feedback! This tutorial was written by Mellie on June 12, 2014 and is copyright to me, the way I word thing's and the images that I use. All other images are copyright to their respective owners, including tubes/art, font, scrapkits and templates and should not be used without purchasing or written permission, nor without reading their terms of use. This tutorial is for education purposes only and is in no way intended to be used as any other purpose. This tutorial was written with the tube and kit in mind that is being shown, therefore, you may have to adjust your setting's should you choose to use images not suggested here, in this tutorial. For this tutorial, you will need to know several things. Paint Shop Pro (I am using version X), and a good working knowledge of how to operate it, layer palettes and plug-in filters, masks, templates...etc. I will also assume that you add your desired drop shadows to each and every layer. :)

You will need the following in order to duplicate my tag:

PSP X or similar version
A Font of choice
Mask 12 by MoonBeams and SpiderWebs
Kit by Monti scraps at CDO
Tube by Anna Liwanag at CDO
Plug-In Xero: Radiance
Penta.com - color dot

Let's begin!

1) Open a new transparent canvas 700 X 700.

2) Choose a close up layer of the tube, copy/paste onto canvas.
Duplicate the tube layer, and go to effects>plug ins>xero>radiance with default settings. Click the original tube layer> layer blend Luminance, opacity 55%.

3) Open frame 7. Copy/paste onto canvas. Resize to 70%. Drag as bottom layer. Using magic wand click inside the frame and go to selections>modify>expand by 5 pixels. Add a new raster layer and using the dropper tool, select 2 coordinating colors from the frame. I'm using #f1d79d and #5fa2bc, choose gradient as your fill and flood fill the selected area. Deselect and drag below frame layer. 
4) Still on gradient layer, go to effects>plug ins>penta.com>color dot with this setting: 200, 8, 255, 255, 255. Click ok.

5) Click your frame layer. Use the magic wand to select the inside again, and go to selections>modify>expand by 5 pixels. Selections>invert. Click on your top tube layer tap delete on the keyboard. Repeat for original tube layer.

6) Deselect and stand on copy of tube layer> blend mode hard light, opacity 85%. Stand on original tube layer and go to effects>plug ins>xero>radiance, default settings. Repeat.

7) Open element 69. Copy/paste as new, top layer. Resize to 70%. position mid/top right of frame.

8) Open element 70. Copy/paste as new layer. Drag to bottom layer, resize to 70% and position just to the top right of former element layer.

9) Open element 80. Copy/paste as new, top layer. Resize to 70% and position left mid/bottom of frame.

10) Open element 4. Copy/paste as new, top layer. Resize to 30% and go to Image>free rotate, click right, click free and type in 60.00, click ok. Position to bottom of flower element.

11) Copy/paste close up layer of tube. Drag below the bow layer. Image>resize 65%. Place her so that the bow will cover up where the image is cut off.

12) Copy/paste paper 4 as new, bottom layer. Add your mask, layers>merge group and resize this layer as desired.

13) finally, add your name and copyright information. Layers>merge visible and copy/paste as new to crop. Resize as desired.

That's it, you're done.
I hope you have enjoyed this tutorial!

-Mellie

Friday, June 13, 2014

Red Riding Hood Tutorial


You can click the image to see it in full size.

Thank you for taking the time to do my tutorial. I hope you enjoy it, and would love to see your results, and receive your feedback! This tutorial was written by Mellie on June 12, 2014 and is copyright to me, the way I word thing's and the images that I use. All other images are copyright to their respective owners, including tubes/art, font, scrapkits and templates and should not be used without purchasing or written permission, nor without reading their terms of use. This tutorial is for education purposes only and is in no way intended to be used as any other purpose. This tutorial was written with the tube and kit in mind that is being shown, therefore, you may have to adjust your setting's should you choose to use images not suggested here, in this tutorial. For this tutorial, you will need to know several things. Paint Shop Pro (I am using version X), and a good working knowledge of how to operate it, layer palettes and plug-in filters, masks, templates...etc. I will also assume that you add your desired drop shadows to each and every layer. :)

You will need the following in order to duplicate my tag:

Kit by MontiScrap at CDO
Tube by Pin Up Toons at CDO
Font - Segoe Print
Mask 89 

Let's begin!

1) Open the mask. Open paper 2, duplicate (shift + D) and close he original. Apply mask, layers>merge>group. Image>resize 75%.

2) Open frame 1, copy/paste onto your canvas and close the original. Resize as desired. Take your magic wand and click inside the frame, and go to selections>modify>expand 3 pixels, add a new layer and fill with paper 2 at 50% size. Deselect and drag this layer below the frame layer.

3) Open element 5, copy/paste and close original, resize as desired. Position behind the frame, but above the mask layers. Repeat process with element 17, only position opposite the wolf. :)

4) Open your tube, copy/paste as new, top layer and resize as desired. I used my magic wand tool to select the area inside the frame layer, and then clicked my tube layer and selections>invert, to erase the pixels stuck outside of the frame. I wanted her to appear to be coming out of the frame. Deselect.

5) Open element 2, copy/paste as a new layer, just below the frame but above the tree layer. Resize as desired.

6) For the next step, I made a sort of cluster area on the bottom right of the frame. I used elements 21, 23 (mirror), 14, 8 and 20, in that order. I resized as needed and arranged. You can view my image as a guide.

7) Now, open the word art element, copy/paste as a new layer. Resize as desired and position to the bottom left.

8) Almost done! Add your name to the tag and your copyright information. Merge layers visible, copy/paste as new image and save as. That's it, you're done :)
Thank you for doing this tutorial. I'm glad you stopped by. I hope to have more tutorials in the near future, so keep checking back. :)

Wednesday, May 28, 2014

Sew Adorable - CT Tag for Monti

This adorable scrap kit MEGA can be purchased at CDO, by Monti's Scraps. 
And the amazing tube to go along with it by Michi
It is also a mega tube, which has several layers for you to play with!


Thursday, May 15, 2014

Sweet As Honey

A Photoshop Sig tag Tut


You can click the image to see it in full size. Thank you for taking the time to do my tutorial. I hope you enjoy it, and would love to see your results, and receive your feedback! This tutorial was written by Mellie on May 15, 2014 and is copyright to me, the way I word thing's and the images that I use. All other images are copyright to their respective owners, including tubes/art, font, scrapkits and templates and should not be used without purchasing or written permission, nor without reading their terms of use. This tutorial is for education purposes only and is in no way intended to be used as any other purpose. This tutorial was written with the tube and kit in mind that is being shown, therefore, you may have to adjust your setting's should you choose to use images not suggested here, in this tutorial. For this tutorial, you will need to know several things. Photo Shop (I am using version CS3), and a good working knowledge of how to operate it, layer palettes and plug-in filters, masks, templates...etc. I will also assume that you add your desired drop shadows to each and every layer. :)

To copy and paste in photoshop you will need to go to Select>ALL, then Edit>Copy.
With photoshop I use the move tool and transform them to resize so I cannot give you an accurate pixel size for each element. Just use your judgement. :)
To mirror an image, you go to Edit>Transform>Flip Horizontal.

For this tutorial you will need the adorable scrap kit by Monti, available at CDO

1) Let's begin by opening element 17. Duplicate it (Image>Duplicate) and close the original.
2) Let's resize the canvas, Image>Canvas size> 700 X 700 pixels and click ok.
3) Now, open frame 3. Copy/paste as new layer. Using the move tool (press V on keyboard) make sure on the top toolbar the box is ticked by "Show Transform Controls" and drag it smaller so that you can line up the honeycomb patterns with the first layer. It may take you a few tries, but it helps to zoom in (CTRL and + together) to see it well enough.
4) Now grab the magic wand tool, click the blank areas inside the frame layer ( I found 3) and go to Layer>New>Layer, choose a paper from the kit. I like paper 4. Open it in photoshop, and go to Edit>Define pattern. Now, using the paint bucket tool ( press G) flood fill it with the pattern/paper 4. Deselect by pressing CTRL + D. (same as psp!) Now drag this layer below the frame layer. Click on the frame layer in the palette and add a drop shadow. Here's how: at the bottom of the layer palettes is FX, press it with your mouse, and choose drop shadow. Play with the setting's or you can use mine:

5) Now let's start adding our goodies! I am using element 35 as my main/tube image. You can use my sig tag as a guide on element placement, or go off on your own. Just use the move tool to drag, or push the images to size up or down to your liking.
I'm adding element 11 above the frame layer and then adding element 19 as well as 48 and 30. Lastly I added the wordart 2. Now add your copyright information, we cannot forget that part. Almost done.
Now let's add our name. This is going to be a bit tricky, but you'll get it!
Grab the text tool (press T on your keyboard) and choose a font. I am using Bell Bottom Laser 60 pt. I set my color to the darkest brown that Monti used in the kit, you can use your eyedropper tool (press I) and select a color that way. Or just set the foreground to color # of choice. Add your name and at the top toolbar strip, choose Create warped text. Just click it once with the mouse and a box will appear, in the style drop down choose Arc, and set the bend at 50%, check horizontal. Leave the others at 0%, and click on ok. Now you have an arched text! Play around with the settings, if you'd like. Just remember you can go to edit:step backward, or you can press ALT + CTRL + Z and it will undo anything you just did.
Once you are satisfied with your image go to image>trim, this crops off the excess pixels around the sigtag. Save your image and you are done!

CT Tutorial for Monti Scraps -Sew Adorable

Tutorial by Mellie Beans


You can click the image to see it in full size.
Thank you for taking the time to do my tutorial. I hope you enjoy it, and would love to see your results, and receive your feedback! This tutorial was written by Mellie on May 15, 2014 and is copyright to me, the way I word thing's and the images that I use. All other images are copyright to their respective owners, including tubes/art, font, scrapkits and templates and should not be used without purchasing or written permission, nor without reading their terms of use. This tutorial is for education purposes only and is in no way intended to be used as any other purpose. This tutorial was written with the tube and kit in mind that is being shown, therefore, you may have to adjust your setting's should you choose to use images not suggested here, in this tutorial. For this tutorial, you will need to know several things. Photo Shop (I am using version CS3), and a good working knowledge of how to operate it, layer palettes and plug-in filters, masks, templates...etc. I will also assume that you add your desired drop shadows to each and every layer. :)


For this tutorial you will need to purchase the scrap kit that I am using from CDO store, by Monti. I am using the glorious artwork of Caron Vinson, which can also be purchased at CDO.
You must first register with CDO for a license number in order to use their artist's tubes.

Let's get started! :)

First let's open the little frame: Frame 3, duplicate your image, and close the original.
Take the magic wand tool and click all blank areas within the frame, I clicked 3 times, select>modify>expand by 5 pixels and add a new layer. Flood fill this layer with paper 13, or other paper of your choice. Deselect and drag this layer below the frame layer.
Now, open your tube, and copy layer 2. Paste it onto the canvas and grab the move tool, make sure that "show transform controls" is selected on your toolbar. You should be able to form it to fit just right inside that frame area. Just pull, stretch or push to fit, and once it is just right click on apply.
Now, lets make the canvas size larger. Go to Image>Canvas size, and type in 800 X 650 pixels, click ok.
Add the female mannequin element as the top layer, and resize as desired. Drop shadow your layer.
Add the ball of wool 5 as your next layer, resize as desired. Drop shadow your layer.
Add the matching thread spool, and the coordinating needle and thread elements. Repeat resize and drop shadow steps.
Time to add some text! Using your text tool, type out the words "You Make Me Sew Very Happy" I am using Lobster Two 14 pt. I'm going to show you how to make it wavy and larger. Once you type the words out, click the Warp text tool, on your tool bar at the top, in style, in the drop down choose either flag, make sure that the Horizontal is checked and change the bend amount to 65%. Horizontal and Vertical distortion stay at 0%  Click ok. Viola!
Right click the layer in your layer palette and choose "rasterize type". Now grab the move tool and resize, or rotate as desired. Add your name for your sig tag.
Once you are satisfied with your results, merge visible layers and go to Image>trim. Save as and you are done! Thank you for doing this tutorial. I'm glad you stopped by. I hope to have more tutorials in the near future, so keep checking back. :)

Tuesday, April 1, 2014

CT Tutorial for Monti Scraps

Have you seen the new bonus tube for April, from PinUp Toons? She's deliciously adorable and I am totally in love. I had to have her, so I bought myself 2 tube packages that were new for this month. One is themed for Easter, but the other one is themes with tiny little fairy girls and I feel so lucky to have them!

Here is a new tag that I made for Monti (CT Tag), using her new IB-PinUp Toon April bonus tube kit! It's available to purchase HERE at CDO store, as well as the new tubes from PinUp Toons!

Isn't she just the sweetest lil thing?!?!


Wednesday, March 26, 2014

CT Tutorial- Monti Scraps-Marika IB 8-1


You can click on the image to see it full sized :)
Thank you for taking the time to do my tutorial. I hope you enjoy it, and would love to see your results, and receive your feedback! This tutorial was written by Mellie on March 26, 2014 and is copyright to me, the way I word thing's and the images that I use. All other images are copyright to their respective owners, including tubes/art, font, scrapkits and templates and should not be used without purchasing or written permission, nor without reading their terms of use. This tutorial is for education purposes only and is in no way intended to be used as any other purpose. This tutorial was written with the tube and kit in mind that is being shown, therefore, you may have to adjust your setting's should you choose to use images not suggested here, in this tutorial. For this tutorial, you will need to know several things. Paint Shop Pro (I am using version X), and a good working knowledge of how to operate it, layer palettes and plug-in filters, masks, templates...etc. I will also assume that you add your desired drop shadows to each and every layer. :)

For this tutorial, you will need the following items:

Tube by Marika, available at CDO
IB Scrap Kit by Monti, available at CDO

My Mask here
Font of choice - I used Gigi.

***ATTENTION***
For your convenience I have made a
page with the shortcuts that I generally use in PSP. 


Let's begin! :)


1. Create a new transparent canvas 700 X 700 pixels.

2. Open paper 4, copy/paste as new layer on the canvas. Add the mask, and layers>merge>group. Image>resize>75%, all layers unchecked.

3. Open paper of choice, I am using paper 5, set your foreground pattern to paper 5, background to NULL, and your preset shape tool to rounded rectangle. Create a frame image about 333 X 333 pixels, vector checked, anti-alias checked, width 30, line style solid.
Objects>align>center.
4. CTRL + A, CTRL + F, floating image go to effects>3D effects, cutout with this setting: V 0, H -1, opacity 50 and blur 30.00, shadow color #
ee9a14. Make sure the fill with is unchecked. CTRL + D to deselect.
5. Open element 17, copy it. Use your magic wand to select the blank inside portion of the frame we just made. Paste element 17 as a new layer. Position as desired, you can use my image above as your guide :)
While still selected we need to get rid of the overhanging, so go to selections>invert and tap delete on the keyboard. CTRL + D and drag this beneath the frame layer.
6. Open remaining elements that you want to add to the tag. I've used several, again, use my tag above as a guide to placement.

7. Open your tube, and copy/paste the whole image, as your new, top layer.

***do not forget to drop shadow your element and tube layers***

8. Once you have gotten all into place, merge layers and copy/paste to crop. ADD YOUR WATERMARK & ARTISTS COPYRIGHT INFO.
Save as and you are done! :)Thank you for doing this tutorial. I'm glad you stopped by. I hope to have more tutorials in the near future, so keep checking back. :)

Here is another version that I did for Monti :)