Click the image to see it in full size.
Thank you for taking the time to do my tutorial. I hope you enjoy it, and would love to see your results, and receive your feedback! This tutorial was written by Mellie on January 25, 2014 and is copyright to me, the way I word thing's and the images that I use. All other images are copyright to their respective owners, including tubes/art, font and scrapkits and templates should not be used without purchasing or written permission, nor without reading their terms of use. This tutorial is for education purposes only and is in no way intended to be used as any other purpose. This tutorial was written with the tube and kit in mind that is being shown, therefore, you may have to adjust your setting's should you choose to use images not suggested here, in this tutorial. For this tutorial, you will need several things. Paint Shop Pro (I am using version X), and a good working knowledge of how to operate it, masks, layer palettes, plug-in filters and animations.
These item's are what you will need for this tutorial:
Mask 1 (Valentine Swirls)
Mask 2 (Heart Burst)
Tube 35-3, by Jamie Kidd, at CDO
IB Scrapkit Jamie Kidd - 35-3 by Schnegge at CDO
Toadies Ommadawn (install into your plug in folder)
Let's get started!
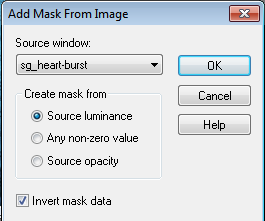
The first thing we need to do is open paper 05, shift + D, close the original. Open both the masks in PSP and apply mask "heart burst" with this setting:
Layers>Merge group. Add a new layer, send to bottom in your layer palette. Grab your airbrush tool, with these settings:
I am using color #b7edf3 from the tube. Spray the layer for several consecutive seconds. (2-3) and release. You may want to resize this layer, I did by 85%. Effects>Plug Ins>Toadies>Ommadawn with these settings:
Open paper 03, and on a new layer, flood fill the canvas with it. Apply the valentine swirls mask only this time UNCHECK the invert mask data. Drag this layer above your bottom layer, so that it is your second layer and between bottom and former mask layer.
Open element 06 and copy/paste as a new layer. Position to the left on canvas. Layers>Duplicate>Image>Free rotate> Click right and 90°, make sure you're not rotating all layers! Layers>duplicate>Image>Flip. Go back to the original layer element 06 and duplicate again, Image>Mirror. Merge the 4 together and add drop shadow.
Open Frame 02, and copy/paste as a new layer, making sure it is your top layer now. Click the inside of it with your magic wand and Selections>Modify>Expand 5 pixels, ok. Add a new layer and flood fill with paper 05, pull this layer below your frame layer and deselect. On your frame layer, go to Image>Free rotate>Left>90°, Image>Flip. Click your flood fill layer, selections>select all>selections>float, paste the largest of the tube layers as a new layer, selections>Invert and on the tube layer, tap delete on keyboard. In your layer palette change the blend option to overlay.
Open element 04, the flower, set your foreground color to #2e7697, copy/paste as a new layer, top layer, and grab your recolor tool and tap it several times. Image>Resize by 45%, add drop shadow and place over the black flower on the frame. Open the element 08 and repeat copy/paste and colorizing steps, drag beneath the flower layer and free rotate to your liking. I used something like 20% and flipped a couple of mine. Don't forget to add drop shadows and sharpen your layers!
Add remaining elements of choice, I used the butterfly and word art. Drop shadow and position.
Add your tube behind the fern and flower layers, but above the frame layer.
Add your name and any last item's. Add your copyright information. Resize as needed.
On your bottom layer, the ommadawn layer, click the black lines with your magic want tool, flood fill with a matching color I am using #2e7697. Adjust> add/remove noise>add noise with this setting Gaussian checked, monochrome checked, noise level 20%, click ok. Deselect>Layers>merge all flatten. Copy/paste into animation shop as a new image> Go back to PSP and undo merge, undo deselect and undo add noise. Add noise again, this time changing noise level to 30%. Deselect, merge and copy/paste into animation shop after current frame. Go back to psp and undo merge, undo deselect, undo add noise. Add noise again, only this time changing noise level to 40%. Repeat deselect, merge and copy/paste after current in animation shop. Save your image!
Thank you for doing this tutorial. I'm glad you stopped by. I hope to have more tutorials in the near future, so keep checking back. :)


